Creating an Organiser Account
Before you can set up and publish an event on Race Space you will need to create an organiser account which will serve as your hub for all things event-related.
There are two steps to organiser account creation.
- Quick Set-Up outlines the minimum account information we will need in order for you to begin creating events.
- Full-Set Up includes the complete account information we will need in order for you to publish events.
Organiser Account: Quick Set-Up

1. Hover your mouse over the Race Directors button in the menu bar at the top of the screen, then select Setup Organiser Profile from the dropdown.
2. If you are not signed in, you will be prompted to register/login to a Race Space user account.
3. Once registered/logged in as a user you will be asked for the below information:
- Currency: This is what you can charge participants in and the currency we will transfer to you.
- Organisation Country: This is where in the world your organisation is based. The currency you select in the first field must be the common currency in the region, so non-matching choices will automatically be filtered out. This selection also manages payout, tax and any Know Your Customer (KYC) checks.
- Trading Name: This is the organisation name that you prefer to be known as – not necessarily your organisation’s legal name. This is the name that will be shown to participants and define your URL structure.
4. Once complete, select Create profile & create event.
5. With your Quick Set-Up information submitted, you now have the option to create events and/or use Race Space as an organiser. You also have the option to select Create profile & go to profile which will allow you to publish events. These additional steps are covered in Full Set-Up below.
Organiser Account: Full Set-Up
1. Hover your mouse over the Race Directors button in the menu bar at the top of the screen, then select Setup Organiser Profile from the dropdown.
2. Complete steps 1-3 of Quick Set-Up above and select Create profile & go to profile.
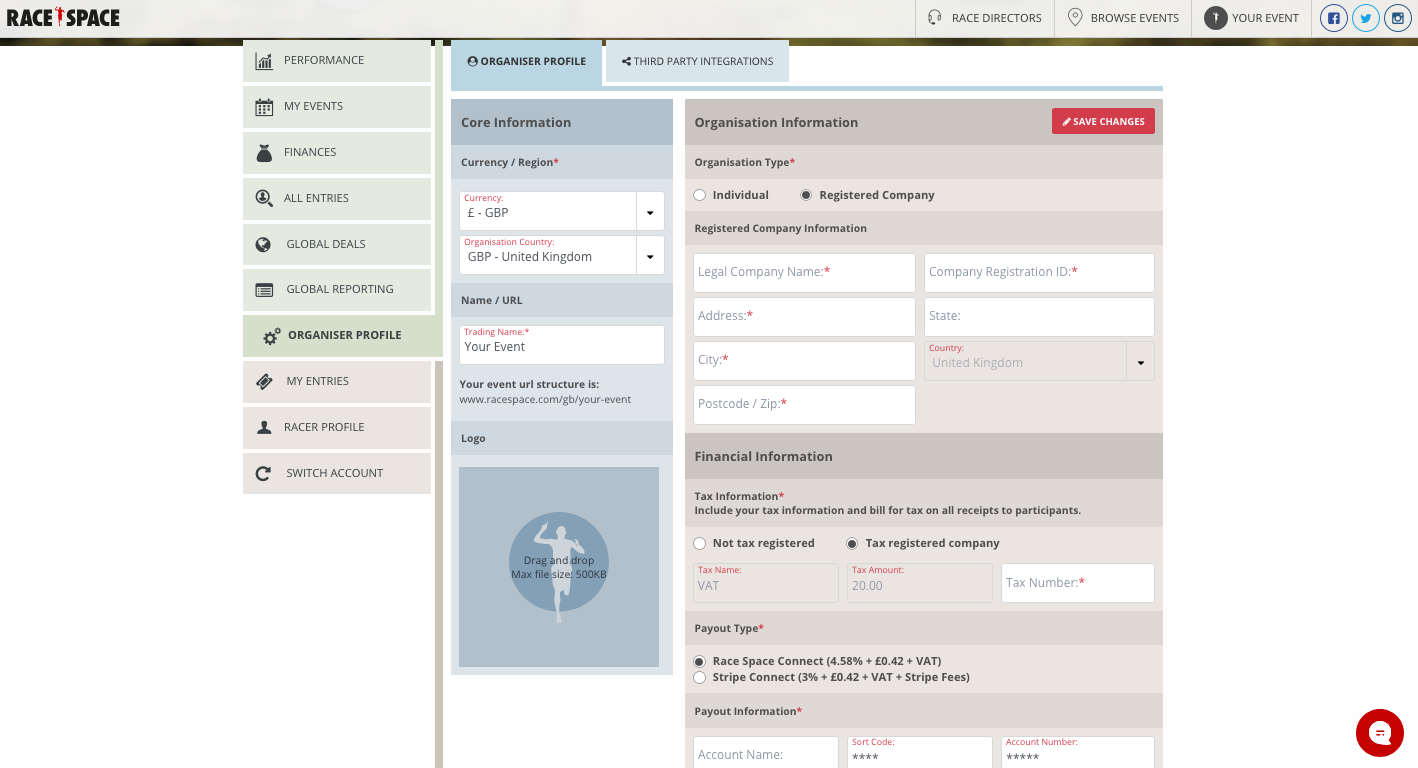
3. In the left hand, blue box section (Core Information), you can change Currency, Organisation Country and Trading Name up until you publish your event. Once you publish your event these will become a dependency and will only be editable if you contact Race Space.
4. You can also drag-and-drop your logo. This will show to your participants across your events, ticketing and receipts. Please ensure your logo fits in a square or circular format, or it will be cropped.
5. Click anywhere in the right hand, grey box section (Organisation Information) and you will be asked for details on the below:
- Organisation Type: Select whether you are a Registered Company or an Individual.
- Registered Company Information: If you selected Registered Company, this is where you will enter your Legal Company Name, Company Registration ID and Address.
- Tax Information: This is where you can state whether or not your organisation is tax registered. Completing tax details will include tax information on all receipts to your participants.
- Payout Type: Choose how you want to receive funds from Race Space. Either using Race Space Connect, where we handle all payment processing ourselves or Stripe Connect where you connect to your own Stripe account and they will handle all payment processing. Please note, once an event is published this section will become a dependency and will only be editable if you contact Race Space.
- Payout Information: Connect your payment account with Race Space. For Stripe Connect click the Stripe Connect button and Stripe will connect your account. For Race Space Connect enter your bank account information (which can vary from country to country).
- Pay-In Information: As an additional option, you can provide us with card details should you need to process a refund and Race Space does not hold enough money on your account. Please note, if no default card is provided and we do not hold enough money on your account then the refund will fail.
6. Once this information is completed select the Save Changes button in the top right corner of the grey box section.
Still stuck? How can we help?

